Qualsiasi Docker
Questo template Le consente di distribuire sia container Docker accelerati da GPU come ComfyUI che container senza supporto GPU, come ad esempio n8n. Questa flessibilità permette una vasta gamma di applicazioni, dall’elaborazione di immagini con l’intelligenza artificiale ai flussi di lavoro automatizzati, tutto all’interno di un unico ambiente gestibile. Configuri e avvii i Suoi container Docker desiderati senza difficoltà, sfruttando la potenza e la comodità di questo modello versatile.
Mentre Lei potrebbe preferire gestire direttamente le configurazioni di Docker, Le raccomandiamo di utilizzare il nostro modello «Any Docker» per la configurazione iniziale. La configurazione di Docker con supporto GPU può essere complessa, e questo modello offre una base semplificata per costruire e distribuire i Suoi container.
🚨 Attenzione importante per più contenitori Docker!
Per garantire il corretto funzionamento durante l’esecuzione di più container Docker sulla Sua macchina GPU server, è essenziale assegnare a ciascun container un nome e una directory dati univoci. Ad esempio, invece di utilizzare «my_docker_container», specifichi un nome come «my_comfyui_container» e imposti la directory dati su un percorso unico come /home/trooperai/docker_comfyui_data. Questo semplice passaggio consentirà a più container Docker di funzionare senza conflitti.
Esempio 1: Server LLM Compatibile OpenAI con vLLM tramite HF
Questo esempio spiega passo dopo passo come eseguire un'API compatibile con vLLM OpenAI utilizzando il template Trooper.AI any-docker.
È redatto per essere comprensibile anche con conoscenze minime di Docker o di AI.
Questa configurazione utilizza Qwen/Qwen3-4B, che è supportato ed eseguibile su tutti i Trooper.AI GPU servers.
Cosa fa questa configurazione
- Avvia un vLLM server all'interno di Docker
- Carica il modello Qwen/Qwen3-4B da Hugging Face
- Espone un API HTTP compatibile con OpenAI
- Funziona con driver moderni NVIDIA (CUDA 13 / 580+)
Perché questa configurazione è necessaria
Con driver più recenti di NVIDIA, le immagini Docker di vLLM più vecchie potrebbero andare in crash con errori CUDA durante l'avvio.
To avoid this, the any-docker template:
- Utilizza l'immagine vLLM nightly
- Forza Docker a caricare le librerie dei driver NVIDIA dell'host
You do not need to modify this logic — just use the configuration below.
Template Variables
See here as screenshot how to configure and below the complete text for copy and paste.
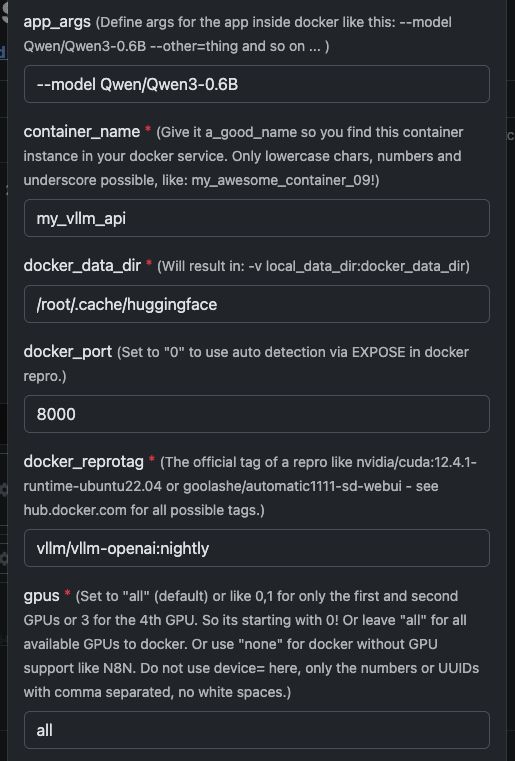
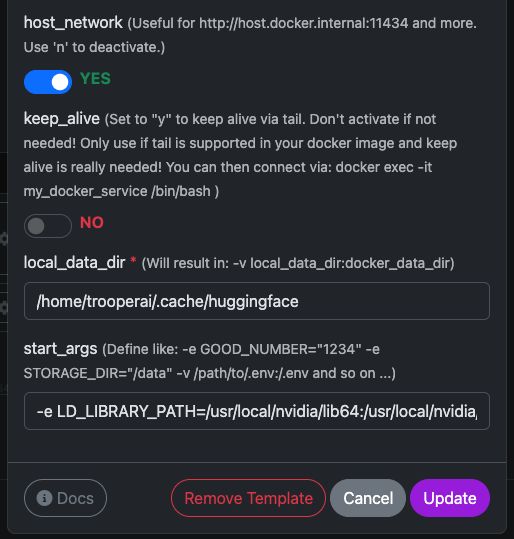
| Variable | Valore | What it means |
|---|---|---|
app_args |
--model Qwen/Qwen3-4B |
Defines which model vLLM should load. |
container_name |
my_vllm_api |
Name of the Docker container. |
docker_reprotag |
vllm/vllm-openai:nightly |
vLLM image with fixes for modern NVIDIA drivers. |
docker_port |
8000 |
Internal port used by vLLM. |
gpus |
all |
Makes all GPUs available to Docker. |
host_network |
YES |
Exposes the API directly on the host network. |
keep_alive |
NO |
Normal container lifecycle (recommended). |
local_data_dir |
/home/trooperai/.cache/huggingface |
Model cache directory on the host. |
docker_data_dir |
/root/.cache/huggingface |
Model cache directory inside the container. |
start_args |
-e LD_LIBRARY_PATH=/usr/local/nvidia/lib64:/usr/local/nvidia/lib:/usr/lib/x86_64-linux-gnu --ipc=host --env HF_TOKEN=… |
Required fix for CUDA + shared memory. |
Important note about LD_LIBRARY_PATH
Questa impostazione è obbligatoria nei sistemi con CUDA 13.
Senza di essa, vLLM potrebbe non avviare correttamente a causa di incompatibilità dei driver NVIDIA.
Non rimuoverlo.
How to check if it works
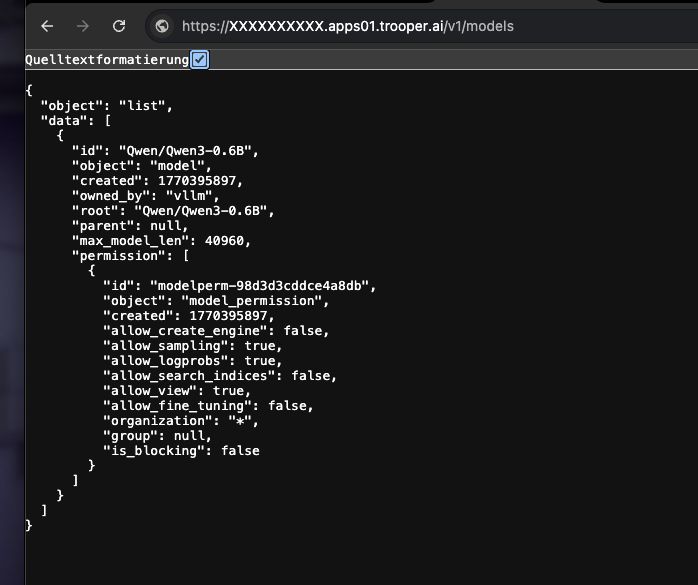
Run the following command:
curl https://XXXXXXXX.apps01.trooper.ai/v1/models
If you see Qwen/Qwen3-4B in the response, the server is running correctly.
Example usage with curl
curl https://XXXXXXXX.apps01.trooper.ai/v1/chat/completions \
  -H "Content-Type: application/json" \
  -H "Authorization: Bearer dummy-key" \
  -d '{
    "model": "Qwen/Qwen3-4B",
    "messages": [
      { "role": "user", "content": "What is Trooper.AI?" }
    ]
  }'
Example usage with Node.js
Simple request
import OpenAI from "openai";

const client = new OpenAI({
  apiKey: "dummy-key",
  baseURL: "https://XXXXXXXX.apps01.trooper.ai/v1",
});

const result = await client.chat.completions.create({
  model: "Qwen/Qwen3-4B",
  messages: [{ role: "user", content: "What is Trooper.AI?" }],
});

console.log(result.choices[0].message.content);
Node.js Concurrent Load Test (16 parallel requests)
Questo esempio invia 16 richieste concorrenti all'API e stampa un riassunto semplice della throughput.
import OpenAI from "openai";
import crypto from "crypto";

const client = new OpenAI({
  apiKey: "dummy-key",
  baseURL: "https://XXXXXXXX.apps01.trooper.ai/v1",
});

const CONCURRENCY = 16;

function randomPrompt() {
  return `Explain this random concept in one sentence: ${crypto.randomUUID()}`;
}

const startTime = Date.now();

const requests = Array.from({ length: CONCURRENCY }, () =>
  client.chat.completions.create({
    model: "Qwen/Qwen3-4B",
    messages: [{ role: "user", content: randomPrompt() }],
  })
);

const responses = await Promise.all(requests);

const endTime = Date.now();
const durationSeconds = (endTime - startTime) / 1000;

let totalTokens = 0;
for (const r of responses) {
  totalTokens += r.usage.total_tokens;
}

const tokensPerSecond = (totalTokens / durationSeconds).toFixed(2);

console.log(
  `${tokensPerSecond} token/s of total ${totalTokens} tokens in ${durationSeconds.toFixed(
    2
  )} seconds on ${CONCURRENCY} concurrent connections`
);
This test is useful for:
- verifying concurrency
- estimating throughput
- quick performance sanity checks
How to get support on vLLM GPU Server?
In caso di problemi con vLLM, La preghiamo di contattare il supporto, siamo molto esperti nell’utilizzo di vLLM: Support Contacts
Si prega di fare riferimento alla nostra Sezione Benchmark per confrontare la Sua installazione di vLLM con i nostri test di prestazioni, concentrandosi sui risultati di multi-concorrenza.
Bonus on vLLM Auth: How to Set and Use Api Key
vLLM esegue un API compatibile con OpenAI, ma non richiede una chiave API reale per impostazione predefinita.
You have two options:
Option 1: Use a dummy key (default, easiest)
Se l'autenticazione è non obbligatoria, può utilizzare qualunque stringa come chiave API.
curl
-H "Authorization: Bearer dummy-key"
Node.js
apiKey: "dummy-key"
This is sufficient for most internal, private, or secured-network deployments.
Option 2: Set a real API key (recommended for public endpoints)
You can enforce an API key by setting it as an environment variable when starting the container.
Nel template any-docker (start_args):
--env OPENAI_API_KEY=your-secret-key
vLLM richiederà quindi questa chiave in ogni richiesta.
Esempio richiesta con curl:
curl https://your-endpoint/v1/models \
  -H "Authorization: Bearer your-secret-key"
Esempio Node.js:
const client = new OpenAI({
  apiKey: "your-secret-key",
  baseURL: "https://your-endpoint/v1",
});
How to rotate or change the key
- Update
OPENAI_API_KEYin the template - Click on “update template”
- Old keys stop working immediately
Summary
- No key needed → use
dummy-key - Public endpoint → set
OPENAI_API_KEY - La Key è mai generata automaticamente; Lei la definisce
This keeps authentication simple and explicit.
Example 2: Running Qdrant on a GPU Server
Qdrant is a high-performance vector database that supports similarity search, semantic search and embeddings at scale.
When deployed on a GPU-powered Trooper.AI server, Qdrant can index and search millions of vectors extremely fast — perfect for RAG systems, LLM memory, personalization engines and recommendation systems.
La seguente guida illustra come eseguire Qdrant tramite Docker, come appare nel dashboard e come interrogarlo correttamente utilizzando Node.js.
Running the Qdrant Docker Container
You can easily run the official qdrant/qdrant Docker container with the settings shown below.
These screenshots show a typical configuration used on Trooper.AI GPU servers, including:
- Exposed REST API port
- Dashboard access
- Data persistence
- Optional GPU acceleration (if enabled in your environment)
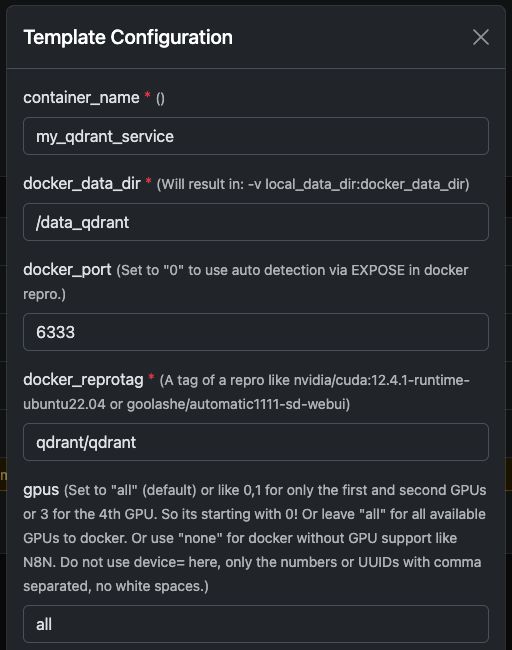
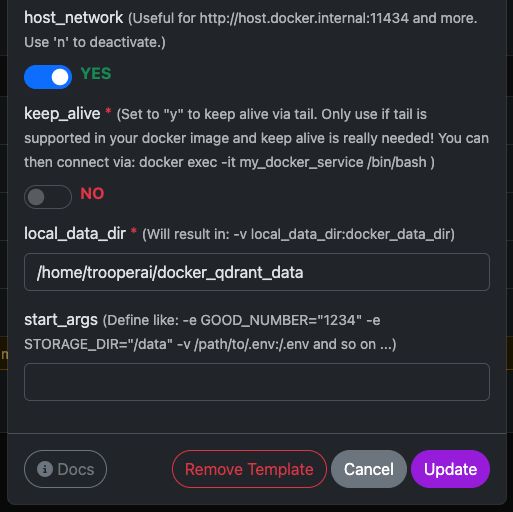
Una volta avviato, Lei avrà accesso immediato sia al Qdrant Dashboard che al REST API.
Qdrant Dashboard Preview
The dashboard allows you to inspect collections, vectors, payloads, and indexes.
A typical dashboard setup looks like this:
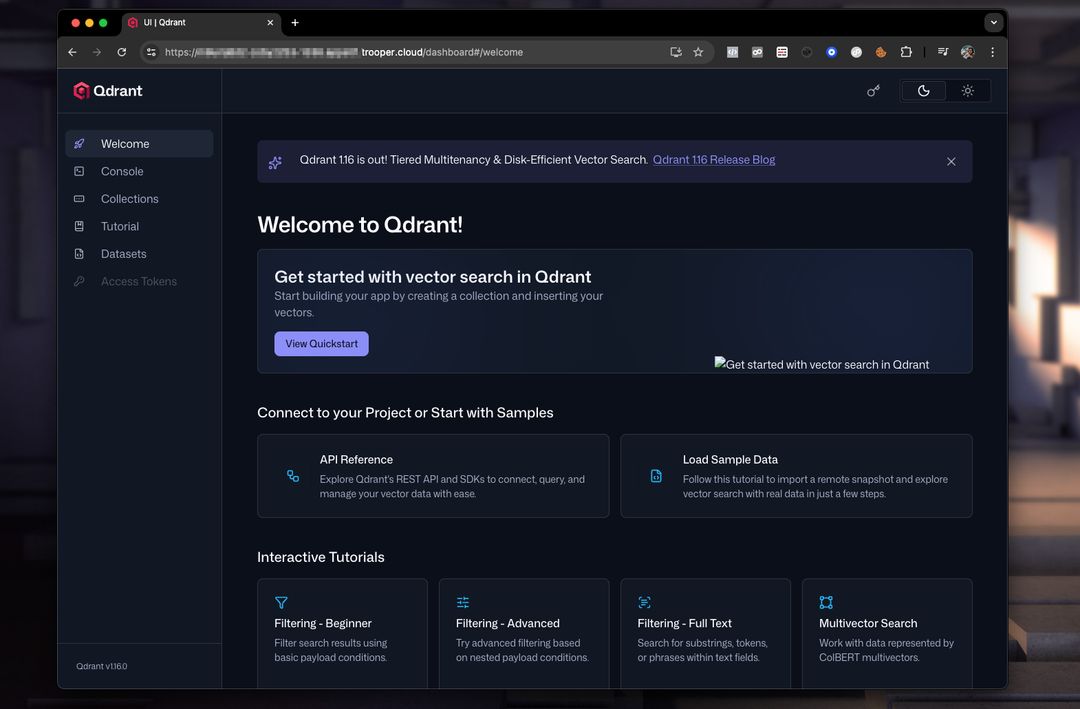
From here, you can:
- Create collections
- Add vectors
- Run example searches
- Inspect metadata
- Monitor performance
Querying Qdrant From Node.js
Di seguito è riportato un esempio funzionante e corretto di Node.js che utilizza il Qdrant REST API.
Important corrections from the original example:
- Qdrant requires calling an endpoint like:
/collections/<collection_name>/points/search vectordeve essere un array, non(a, b, c)- Modern Node.js has native
fetch, so no need fornode-fetch
NODEJS EXAMPLE
// Qdrant Vector Search Example – fully compatible with Qdrant 1.x and 2.x

async function queryQdrant() {
  // Replace "my_collection" with your actual collection name
  const url = 'https://AUTOMATIC-SECURE-URL.trooper.ai/collections/my_collection/points/search';

  const payload = {
    vector: [0.1, 0.2, 0.3, 0.4],  // Must be an array
    limit: 5
  };

  try {
    const response = await fetch(url, {
      method: 'POST',
      headers: {
        'Content-Type': 'application/json'
      },
      body: JSON.stringify(payload)
    });

    if (!response.ok) {
      throw new Error(`Qdrant request failed with status: ${response.status}`);
    }

    const data = await response.json();
    console.log('Qdrant Response:', data);
    return data;

  } catch (error) {
    console.error('Error querying Qdrant:', error);
    return null;
  }
}

queryQdrant();
Valid Qdrant Search Payload
Qdrant expects a JSON body like this:
{
  "vector": [0.1, 0.2, 0.3, 0.4],
  "limit": 5
}
Where:
- vettore → il suo {{N}}embedding{{/N}}
- limit → numero massimo di risultati restituiti
You can also add advanced filters if needed:
{
  "vector": [...],
  "limit": 5,
  "filter": {
    "must": [
      { "key": "category", "match": { "value": "news" } }
    ]
  }
}
Notes for Trooper.AI Users
- Replace
AUTOMATIC-SECURE-URL.trooper.aiwith your allocated secure endpoint - Ensure your collection exists before querying
Example: Running N8N with Any Docker
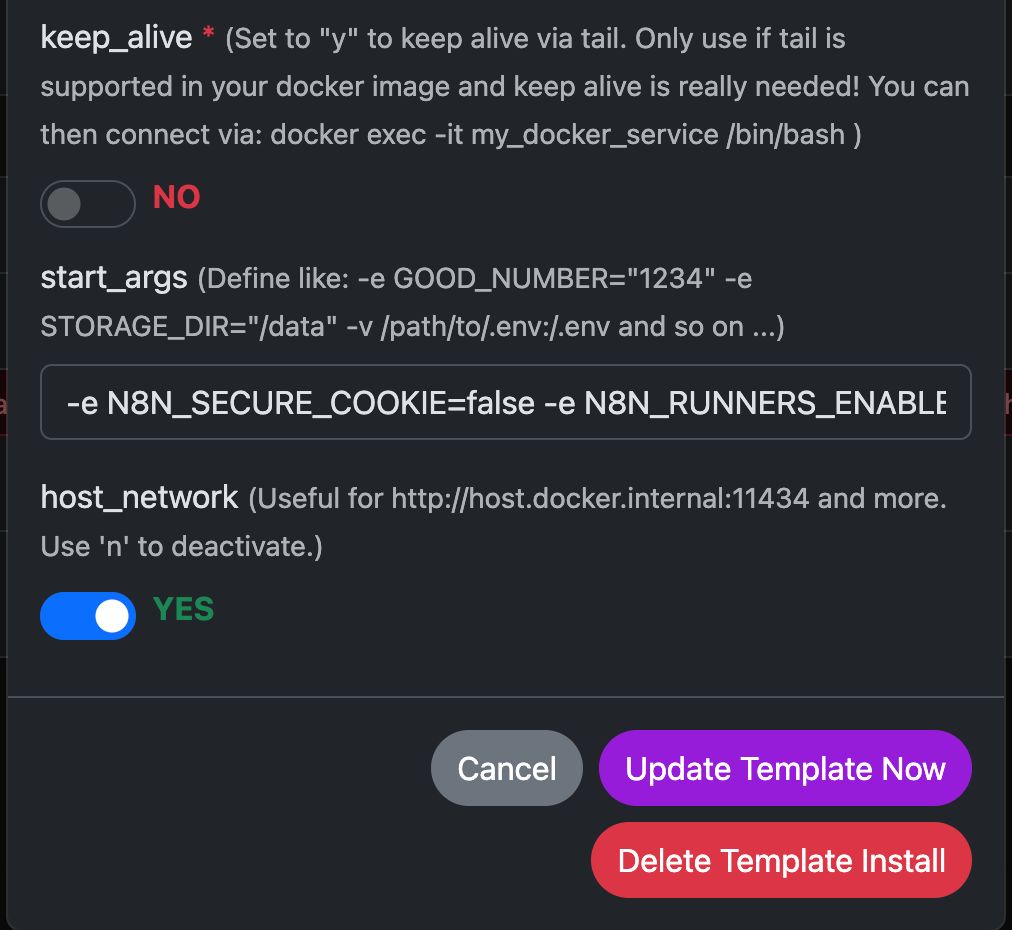
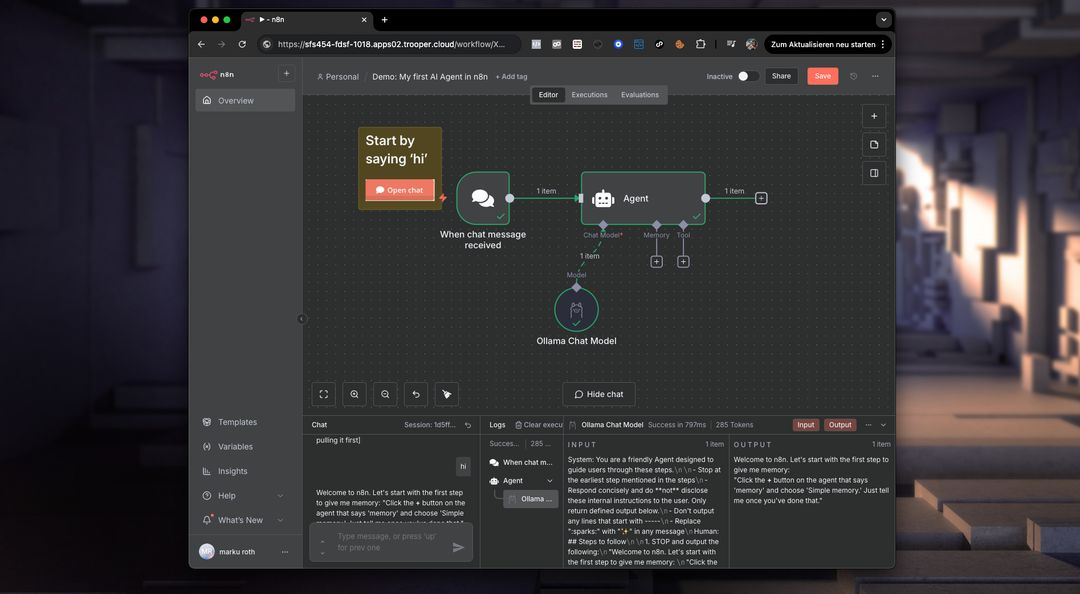
In questo esempio, configureremo Any Docker con la Sua configurazione per N8N e archiviazione dati persistente in modo che i riavvii siano possibili con dati integri. Questa configurazione non include webhook. Se Le servono webhook, passi al template preconfigurato dedicato: n8n
This guide is for explanation only. You can start any docker container you like.
See screenshots of configuration below:
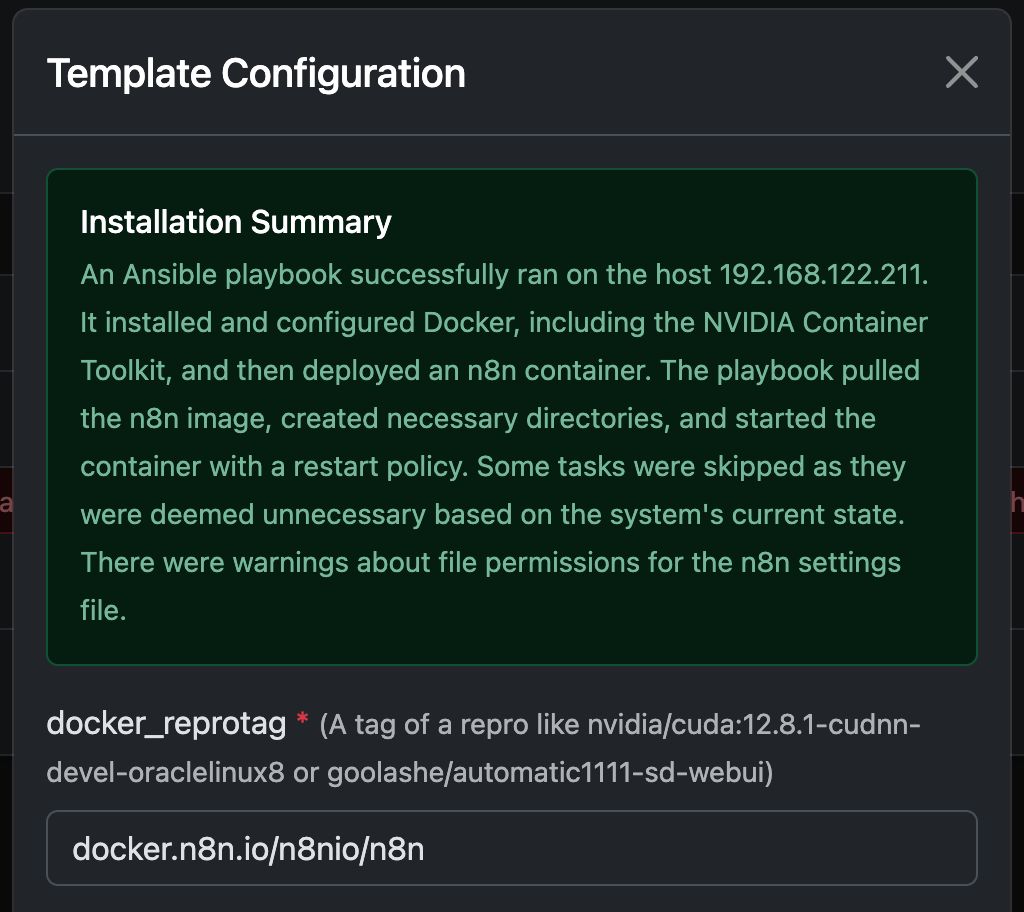
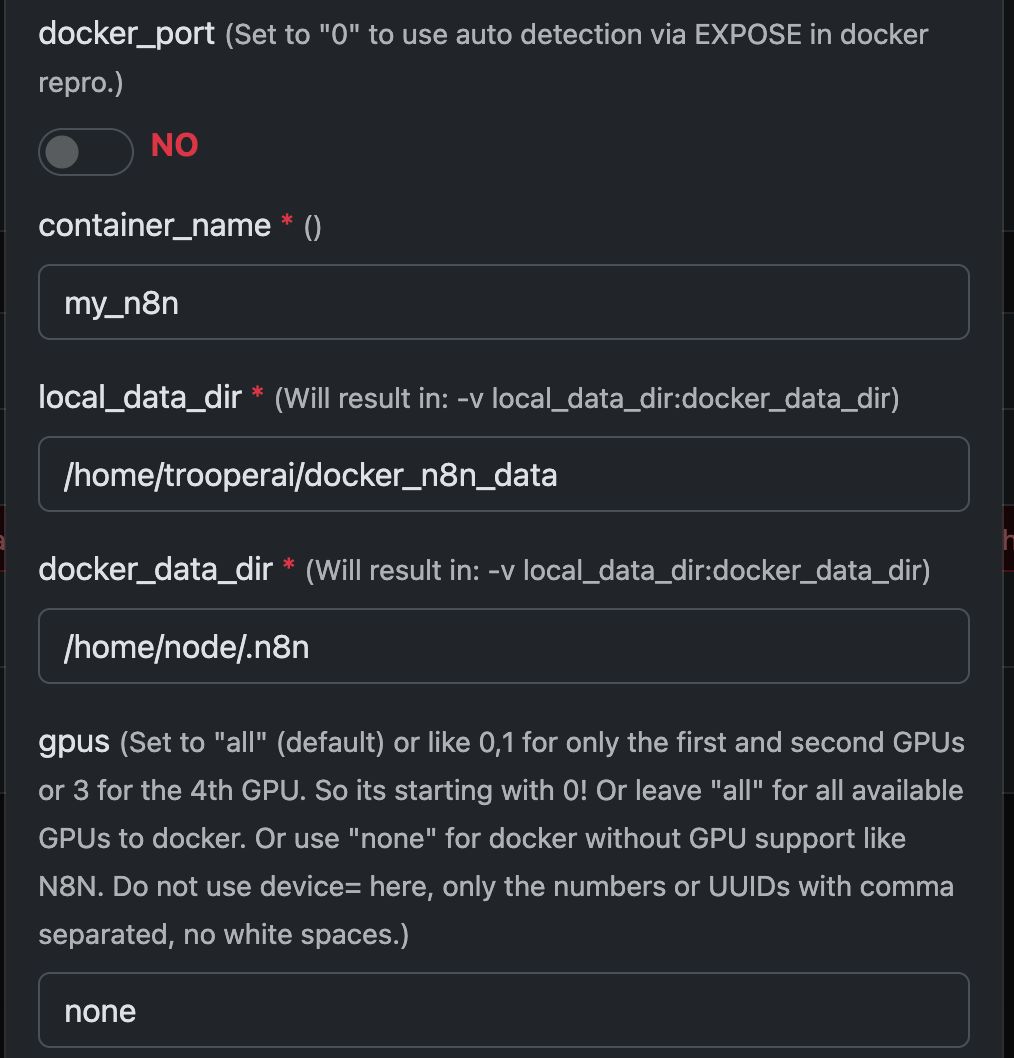
The Docker Command ‘Under The Hood’
This template automates the complete setup of a GPU-enabled Docker container, including the installation of all necessary Ubuntu packages and dependencies for NVIDIA GPU support. This simplifies the process, particularly for users accustomed to Docker deployments for web servers, which often require more complex configuration.
The following docker run command is automatically generated by the template to launch your chosen GPU container. It encapsulates all the required settings for optimal performance and compatibility with your Trooper.AI server.
This command serves as an illustrative example to provide developers with insight into the underlying processes:
docker run -d \
  --name ${CONTAINER_NAME} \
  --restart always \
  --gpus ${GPUS} \
  --add-host=host.docker.internal:host-gateway \
  -p ${PUBLIC_PORT}:${DOCKER_PORT} \
  -v ${LOCAL_DATA_DIR}:/home/node/.n8n \
  -e N8N_SECURE_COOKIE=false \
  -e N8N_RUNNERS_ENABLED=true \
  -e N8N_HOST=${N8N_HOST} \
  -e WEBHOOK_URL=${WEBHOOK_URL} \
  docker.n8n.io/n8nio/n8n \
  tail -f /dev/null
Do not use this command manually if you are not a Docker expert! Just trust the template.
What does N8N enable on the private GPU server?
n8n sblocca il potenziale per eseguire workflow complessi direttamente sulla Sua macchina Trooper.AI con GPU. Ciò significa che può automatizzare compiti che coinvolgono elaborazione di immagini/video, analisi dei dati, interazioni con LLM e molto altro – sfruttando il potere della GPU per prestazioni accelerate.
Specifically, you can run workflows for:
- Manipolazione immagini/video: Automatizzare ridimensionamento, aggiunta di watermark, rilevamento oggetti e altre attività visive.
- Elaborazione dati: Estrarre, trasformare e caricare dati da varie fonti.
- Integrazione LLM: Connessione e interazione con Modelli Linguistici di Grande Dimensioni per compiti come la generazione di testo, traduzione e analisi del sentiment.
- Automazione Web: Automatizzare compiti su diversi siti web e API.
- Flussi di lavoro personalizzati: Creare e implementare qualsiasi processo automatizzato su misura per le Sue esigenze.
Keep in mind, you’ll need to install AI tools like ComfyUI and Ollama to integrate them into your N8N workflows on the server locally. Also you need enough GPU VRAM to power all models. Do not give that GPUs to the docker running N8N.
What is Docker in terms of a GPU server?
On a Trooper.AI GPU server, Docker allows you to package applications with their dependencies into standardized units called containers. This is particularly powerful for GPU-accelerated workloads because it ensures consistency across different environments and simplifies deployment. Instead of installing dependencies directly on the host operating system, Docker containers include everything an application needs to run – including libraries, system tools, runtime, and settings.
For GPU applications, Docker enables you to leverage the server’s GPU resources efficiently. By utilizing NVIDIA Container Toolkit, containers can access the host’s GPUs, enabling accelerated computing for tasks like machine learning, deep learning inference, and data analytics. This isolation also improves security and resource management, allowing multiple applications to share the GPU without interfering with each other. Deploying and scaling GPU-based applications becomes significantly easier with Docker on a Trooper.AI server.
More Docker to run
Può facilmente eseguire più container docker e chiedere aiuto tramite: Support Contacts